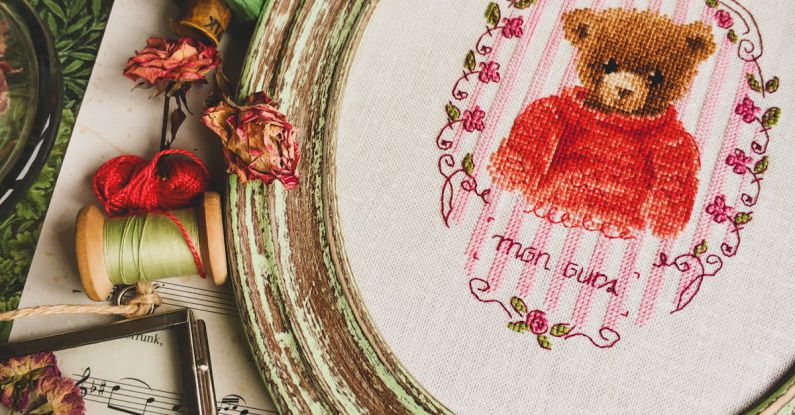
Cross-stitching is a beloved craft that allows enthusiasts to create intricate and beautiful designs using just a needle, thread, and fabric. One popular technique within the realm of cross-stitching is the cross-stitch pattern. Whether you’re a beginner looking to learn the basics or an experienced stitcher wanting to brush up on your skills, mastering how to sew a cross-stitch pattern is essential. In this guide, we’ll walk you through the steps to create your own cross-stitch masterpiece.
Choosing the Right Materials
Before you begin sewing a cross-stitch pattern, it’s crucial to gather all the necessary materials. You will need a piece of cross-stitch fabric, embroidery floss in various colors, a cross-stitch needle, an embroidery hoop, and a pair of embroidery scissors. Select a pattern that suits your skill level and preferences, ensuring you have the correct colors of floss to bring the design to life.
Preparing Your Fabric
To start your cross-stitch project, cut a piece of fabric slightly larger than the size of your finished design. Use an embroidery hoop to stretch the fabric taut, ensuring it remains flat and easy to work with. Securing the fabric in an embroidery hoop will help maintain the tension of your stitches and prevent any puckering or distortion.
Threading Your Needle
Next, select a color of embroidery floss that matches the first section of your pattern. Separate the floss into individual strands, usually two or three strands are used for cross-stitching, depending on the fabric’s weave and the desired coverage. Thread your needle with the appropriate number of floss strands, tying a knot at the end to prevent it from pulling through the fabric.
Creating the Cross-Stitch
Now that your materials are ready, it’s time to start stitching. Begin by working from the center of your design outward, following the pattern’s instructions for stitch placement and color changes. To sew a basic cross-stitch, bring your needle up through the fabric at the bottom left corner of a square, then down at the top right corner to form a diagonal stitch. Complete the cross by bringing the needle up at the bottom right corner and down at the top left corner.
Continuing the Pattern
As you progress through your cross-stitch pattern, pay close attention to the placement of each stitch to ensure the design remains consistent and accurate. Take your time with each stitch, keeping them neat and uniform for a polished finished look. Remember to refer back to the pattern regularly to avoid mistakes and maintain the correct color sequence.
Adding Details and Finishing Touches
Once you’ve completed the main body of your cross-stitch pattern, it’s time to add any additional details or embellishments. This could include backstitching outlines, French knots for texture, or other decorative stitches to enhance the design. Be creative and experiment with different techniques to personalize your cross-stitch creation.
Displaying Your Finished Piece
After putting the final touches on your cross-stitch pattern, carefully remove the fabric from the embroidery hoop and trim any excess threads. Consider framing your finished piece in a hoop or a decorative frame to showcase your handiwork. Your cross-stitch creation can be displayed as wall art, given as a thoughtful gift, or incorporated into other craft projects.
Embracing the Art of Cross-Stitching
Sewing a cross-stitch pattern is a rewarding and meditative craft that allows you to express your creativity and attention to detail. Whether you’re a seasoned stitcher or a novice, mastering the technique of cross-stitching opens up a world of possibilities for creating beautiful and unique works of art. So, gather your materials, choose a pattern that speaks to you, and let your imagination soar as you stitch your way to a masterpiece.